Designers of critical components are on a constant quest for materials that are lighter, stronger and capable of handling ever greater and more complex loads. They especially value high mechanical strength. Yet it is metal fatigue that causes the majority of premature failures in service. To combat this, Ovako has focused on developing clean steels in which the small inclusions that give rise to fatigue failure are closely controlled. Patrik Ölund, Head of Group R&D at Ovako explains how this is done.
Fatigue occurs when a component fails after a large number of repeated loadings, even when the peak load is well below the material’s ultimate tensile stress (UTS). Engineers assess the fatigue performance of a material through laboratory testing, usually in the form of rotating bending fatigue (RBF) testing.
These tests record how many load cycles a specimen will withstand at varying levels of stress before it fails. Because fatigue is statistical in nature several tests must be performed. Eventually we can establish the “fatigue load limit” or “safe load” at which the sample will survive beyond a certain number of cycles (typically 3–10 million).

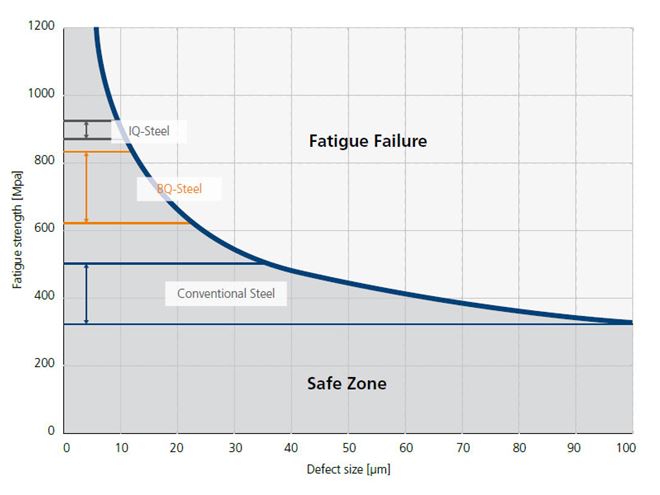
Relationship between defect size and fatigue strength.
How do inclusions influence fatigue life?
One key result from years of extensive fatigue testing of steels is that defects such as non-metallic inclusions act as initiation points for the microscopic cracks that grow to cause failure. The reason is that these inclusions, which are typically larger sulfides in conventional steels and smaller oxides in cleaner steels, act as localized stress raisers. They multiply the nominal load on a component to a local level beyond its safe fatigue limit. This causes the formation of cracks that propagate under cyclic loading to eventually result in failure.
Clearly, a clean steel that contains smaller defects will have a longer fatigue life than conventional steel.
The strong relationship between defect size and fatigue strength. If larger defects are present, then fatigue failure occurs at a lower stress. In a conventional steel there are often significant amounts of defects sized from 60 to 80 μm or even larger. The fatigue strength is therefore around 400 MPa. However, in a clean steel of the same grade, where inclusions are limited to less than 20 μm, the fatigue strength is increased to over 600 MPa and even higher.
Types of clean steel - BQ-Steel® and IQ-Steel®
Ovako’s Bearing Quality (BQ)-Steels are high cleanness steels with a reduced defect size. This can help improve design life and/or increase performance. Moderate design changes can also be made for high and consistent quality end-user products.
Our Isotropic Quality (IQ)-Steels are designed to have small and isolated inclusions with a cleanness comparable to remelted steels. They have isotropic properties that can withstand heavy loads in all directions. This makes IQ-Steel suitable for complex load cases, such as in gears.
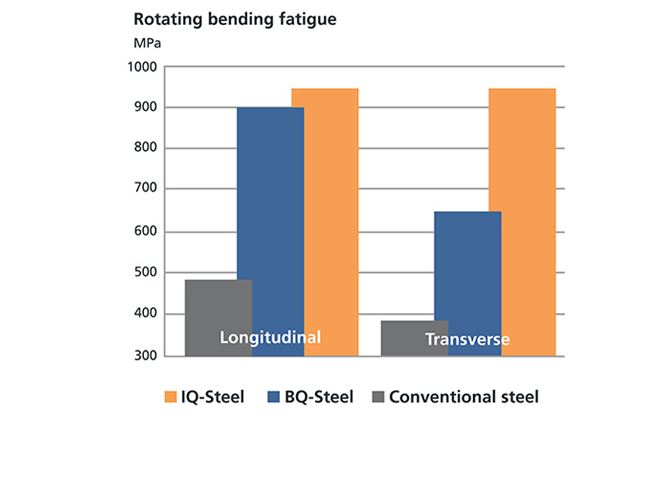
The results of RBF testing on different samples loaded in both the longitudinal and transverse directions. Depending on the loading mode, both BQ-Steel and IQ-Steel offer an improvement over conventional steel.
The significant difference between conventional steel and clean steel is the probability of detrimental defects occurring in the area of a component subjected to high load, where fatigue failure could initiate. When designers specify a clean steel this probability decreases significantly. There is also much less scatter in the test results. So, using a clean steel reduces the need for a high safety factor to account for the potential variability in performance.

Rotating bending fatigue test performance of conventional steel compared with BQ-Steel and IQ-Steel in both longitudinal and transversal direction.
Finding the needle in the haystack
Most international standards do not capture the true distribution of inclusions, because they focus on testing small volumes of steel that do not provide meaningful real-world results. That is why Ovako has worked to develop our own in-house quantification methods. There is no shortcut here, to finding the needle in the haystack: it is essential to investigate larger volumes using a combination of:
- Microscopy: Light optical microscopy (LOM) of large areas is a very well-established technique at Ovako. We also use scanning electron microscopy (SEM) to assess larger volumes of 500 mm3. This provides very useful information on the chemical composition of inclusions, helping to identify their origins, which is important for our process development activities.
- Giga cycle fatigue testing provides valuable data on actual fatigue life, although they can take a long time. Testing is accelerated by using the latest technology that can carry out fatigue tests at 20 kHz. The failed surfaces can be examined to determine the size of the inclusion that caused initiation of the fatigue crack.
-
Immersed high-frequency ultrasonic testing is a technique that is well developed at Ovako, working at 10 MHz to examine large volumes to discriminate larger defects and inclusions. Our standard for this method has been made freely available so anyone can use it. It is a very powerful method for the laboratory and is also deployed at our mills to provide fast feedback on any changes in the production process.
This approach has been extended to higher frequencies . Not only does this cover a large area, it also enables the test to go below the surface to provide a more volumetric measure of the population of inclusions initiating fatigue failures.
The way forward for our quantification program includes four main elements
- Complete the 125 MHz UST procedure with the aim to capture inclusions larger than 20µm.
- Cooperate with key customers to further take benefit of our improved quantification capability. Offer the 10 MHz testing that is already well established as a public procedure

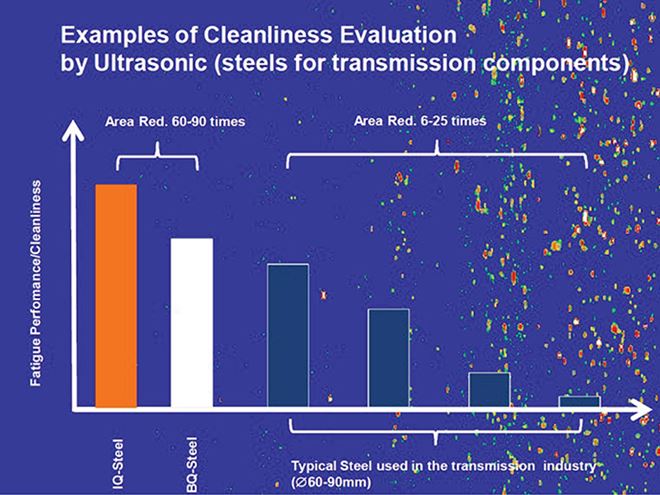
Cleanness evaluation of steel for transmission components
How can steel cleanness become a practical design tool?
The very significant variation in the cleanness of steel used in transmission components. As the failure, this has important consequences for designers.
The failure of a ring gear is due to root breakage, with a distinctive circular pattern known as “fatigue fish eye” observed on the fracture surface. Fractography showed that the crack initiated at large non-metallic defects.
Clearly, the size and distribution of defects in steel has a direct impact on component life. This is further illustrated by the results of the fatigue testing – our ingot cast clean steel offers consistent “run out” with no failure at a life well beyond continuous cast steel in small billets. There is clear correlation with the number of inclusions in the different steel.
We care about clean steel because we care about fatigue
The major design opportunities offered by steel cleanness are important for designers who have in the past relied on old standards. Modern steel production practices open up a new level of fatigue performance that makes it possible to downsize or even redesign components.


